SON OF JOR-EL, KNEEL BEFORE ZOD!
New website for the blog. Also a preview of horrible things to come.

Thursday, January 24, 2013
Tuesday, January 22, 2013
Thanks Mr. Postman!
So two packages arrived today when I got back from class. Thank you eBay and the second hand miniatures market.


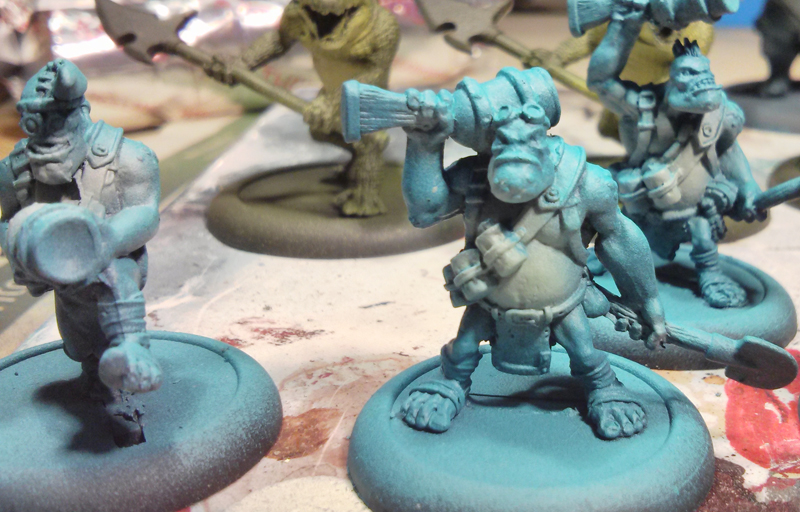
The homeboys with the blue shoulder pads are a squad I've painted up for Grey Knights Inquisitorial Warrior Acolytes. The squads will be differentiated by shoulder pad markings. Those guys and the bar metal ones were from a local swap from kijiji and the rest are eBay purchases. These guys are going to serve two purposes; either IG allies for whatever Imperial army I'm playing, or the bulk of my super flully Inquisition army, backed up be some Power Armour and Terminators.
The biggest problem here is that I realistically have a tonne of models and terrain to paint. Here's a nice compact list:
Trollbloods:
10 Pyg Burrowers and burrow marker
5 Sluggers
1 Totem Hunter
Space Marines/Grey Knights
30 Tactical Marines
50 Terminators
50 Elites/HQs/Devastors
14 Vehicles (easiest part with the airbrush)
48 Inquisition Models (12 more in transit)
An entire Mechanized Eldar Army totalling around 2500 points.
LOADS and LOOOOOAAAADS of terrain
Retribution of Scyrah repaint!
Sentinels + UA
Invictors + UA
Halberdiers + UA
Mage Hunters + UA
2 Mage Hunter Solos
2 Heavy Myrmidons
1 Light Myrmidon
3 Warcasters
The Trollblood stuff I can finish in a week. Most of the Imperial stuff is pretty easy, as I simplified my paint jobs on them as much as I could. The Retribution stuff won't be played for a while, I'm still having loads of fun with my Trolls. The Eldar are competing for brush time with my Imperial stuff, so it's a matter of flipping a coin and seeing who gets the paint first, and deciding on a paint scheme. The terrain is super easy as the majority of it is buildings and hills/forests.
Overall, my plate is totally full - on top of school assignments. I'd like to have, at least, one of my 40k armies completed, or even 2000 points completed before the spring. Oh boy.
Building Europe
Two more 15mm buildings for Flames of War. The last two had a more Eastern feel, so I wanted to do a little more Western/central Europe feel for these guys. Foam core, popsicle sticks, hot glue and sharp knives babes.


Sunday, January 20, 2013
Warmacheen Wing
Ilhan and RogerWhoDoesn'tText came by for some games and sex haberdashery. Ilhan and I got in a game of Warmacheen, Trolls vs. Cygnar. I brought a list I was deliberating over earlier:
eMadrak Ironhide, World Ender
- Pyre Troll
- Dire Troll Mauler
Kriel Warriors (Leader and 9 Grunts)
- Kriel Warrior Standard Bearer & Piper
Krielstone Bearer and 5 Stone Scribes
- Krielstone Stone Scribe Elder
Trollkin Champions (Leader and 4 Grunts)
- Skaldi Bonehammer
and Ilhamfist rocked his jardkorr eHaley list:
Major Victoria Haley
- Lancer


The Imperials facing down a lone Y-Wing. This is how both games ended, hahah.

eMadrak Ironhide, World Ender
- Pyre Troll
- Dire Troll Mauler
Kriel Warriors (Leader and 9 Grunts)
- Kriel Warrior Standard Bearer & Piper
Krielstone Bearer and 5 Stone Scribes
- Krielstone Stone Scribe Elder
Trollkin Champions (Leader and 4 Grunts)
- Skaldi Bonehammer
and Ilhamfist rocked his jardkorr eHaley list:
Major Victoria Haley
- Lancer
Black 13th Gun Mage Strike Team
Sword Knights (Leader and 9 Grunts)
- Centurion
- Centurion
- Ironclad
- Sword Knight Officer & Standard
- Sword Knight Officer & Standard
Trencher Infantry (Leader and 5 Grunts)
He managed to wipe out all but one of the Kriel Warriors, kill off two champs, leaving 2-3 remaining health on the rest, and take eMadrak down to 8 health. On the other hand, one Champ managed to kill the Ironclad on his own with two attacks on 5 dice each with Blood Fury. The game ended with the Mauler with an open charge lane to eHaley on one end and three Champs and Skaldi on the other.


We then played a quick game of X-Wing, 120 points. I can't remember anything from what we ran except Ilhan took Vader, Howler, and Back Stabber and some other dudes. I took Wedge, Dutch, Horton, and a Gold Squadron pilot. He kicked my ass and proceeded to roll Roger.


The Imperials facing down a lone Y-Wing. This is how both games ended, hahah.

Lisa and Boy arrived just in time for some Cards Against Humanity. Some extremely offensive notables from the night:
Jew-fros and Free Samples
Auschwitz and a web of lies
Black People and White People
The profoundly handicapped and Kanye West
BATMAN!!!
Chicks With Dicks
Breast Augmentation
and of course, a big black dick.
Cards Against Humanity was made specifically for people with scrupulous morals and ethics, as well as slightly (extremely) racist individuals. Its awesome.
Saturday, January 19, 2013
Gatormanz, Gatormanz, does whatever Gatormanz canz?
Super epic awesome painting updaaaaaaate! First up, a unit of Gatormanz! After airbrushing them, I slapped on a few washes to bring out the details on the scales and painted on the details. I wanted these guys to look like they were mucking about in a swamp, so I took a great departure from my Trolls' bases. First, they were flocked with sand and kitty litter, which was painted a sort of greyish-brown and dry brushed some highlights on. They then got some gloss varnish on portions of the base to imply wetness and finished with static grass. Simple.


Next up, a full unit of Scattergunners. I'm finishing the bases on them, which I should be able to complete tomorrow night after X-Wing Machine of War night. The full unit isn't pictured, as 12 medium based Hordes models take up a lot of space. I got pretty sloppy with the tartans, but the colours are there and match what I did with Madrak's tartan so it's all good, babes. I really like running these guys with the Krielstone to drop Stealth and layer 11 spray 8s down on opposing armies. Also, they're my second favourite Trollbloods unit models cause they all look like John McClane.


Rok, Calandra, and Captain Gunnbjorn! I've yet to run any of them yet, but I have a few lists rolling around. I'm thinking of making a resilient infantry-heavy Calandra list, a super-shooty, AOE dropping Gunny list, and Rok may be joining Borka in place of the Mauler as I posted a few days ago.


X-Wing Machine of War tomorrow night. Roger's probably swinging by as well and Boy and I may be consuming some brewskis in order for me to effectively run my X-Wings into asteroids.
Be excellent to each other!


Next up, a full unit of Scattergunners. I'm finishing the bases on them, which I should be able to complete tomorrow night after X-Wing Machine of War night. The full unit isn't pictured, as 12 medium based Hordes models take up a lot of space. I got pretty sloppy with the tartans, but the colours are there and match what I did with Madrak's tartan so it's all good, babes. I really like running these guys with the Krielstone to drop Stealth and layer 11 spray 8s down on opposing armies. Also, they're my second favourite Trollbloods unit models cause they all look like John McClane.


Rok, Calandra, and Captain Gunnbjorn! I've yet to run any of them yet, but I have a few lists rolling around. I'm thinking of making a resilient infantry-heavy Calandra list, a super-shooty, AOE dropping Gunny list, and Rok may be joining Borka in place of the Mauler as I posted a few days ago.


I really like how Rok turned out. I re-positioned his torso a bit to make him a little bit more upright to compensate for his giant metal axe. This involved a fat piece of brass running from his nethers to his shoulders and a big ole' greenstuff belly. What I think is hilarious about Rok is that probably about 15-20 years ago, my old man looked like this, except he's short and Greek. The giant ham-fists, big ol' beard, shaggy mane, and Santa gut really resemble my old man years ago. Its hilarious. Plus, it looks like Rok may have some left overs in that beard of his... this model is totally my dad.


Last but not least - check out what Ilhan picked up. 101st Airborne, dropping bombs, plowing moms, powered by Jawn. HA! Boy is looking into some of the armoured companies and Ilhan has the Axis book. Flames of War is about to be rocked.

X-Wing Machine of War tomorrow night. Roger's probably swinging by as well and Boy and I may be consuming some brewskis in order for me to effectively run my X-Wings into asteroids.
Be excellent to each other!
Tuesday, January 15, 2013
Trollbloods and Minions painting
Just a little painting update. I took the airbrush to a unit of Pyg Burrowers, a Gatorman Posse, and my Rok conversion. He may be replacing the Mauler in my 35pt Borka brick list, which looks like this:
Borka Kegslayer
- Pyg Keg Carrier
- Dire Troll Mauler
- Pyre Troll
- Storm Troll
Fell Caller Hero
Trollkin Champions - Leader & 4 Grunts
- Skaldi Bonehammer
Krielstone Bearer & Stone Scribes - Leader & 5 Grunts
- Stone Scribe Elder
However, with Rok:
Borka Kegslayer
- Pyg Keg Carrier
- Dire Troll Mauler
- Pyre Troll
- Storm Troll
Stone Scribe Chronicler
Trollkin Champions - Leader & 4 Grunts
- Skaldi Bonehammer
Krielstone Bearer & Stone Scribes - Leader & 3 Grunts
- Stone Scribe Elder
I really like the spray attack on Rok, and with him in, all three drinking buddies are together - Borka, Skaldi, and Rok. Its like Animal House. Hahah! On to the pictures!


Borka Kegslayer
- Pyg Keg Carrier
- Dire Troll Mauler
- Pyre Troll
- Storm Troll
Fell Caller Hero
Trollkin Champions - Leader & 4 Grunts
- Skaldi Bonehammer
Krielstone Bearer & Stone Scribes - Leader & 5 Grunts
- Stone Scribe Elder
However, with Rok:
Borka Kegslayer
- Pyg Keg Carrier
- Dire Troll Mauler
- Pyre Troll
- Storm Troll
Stone Scribe Chronicler
Trollkin Champions - Leader & 4 Grunts
- Skaldi Bonehammer
Krielstone Bearer & Stone Scribes - Leader & 3 Grunts
- Stone Scribe Elder
I really like the spray attack on Rok, and with him in, all three drinking buddies are together - Borka, Skaldi, and Rok. Its like Animal House. Hahah! On to the pictures!


The actual colours on Rok are better represented in the first three pictures. I'm going to try and finish him for the weekend to bring him out against Ilhan. Also, we got the band back together, so Roger may be joining us for some X-Wing Machine of War. Heyo.
Monday, January 14, 2013
Flames of War Buildings
So I picked up some foam core boards on sale over the weekend with the intent of whipping up some 15mm and 28mm buildings for Flames of War and Warhammer/Warmachine, respectively. Here's a little bit of a tutorial of how I went about putting together a few buildings.
I'm using white on white with the gloss finish here because it was on sale at Michael's - an arts and crafts store with a few locations in both Canada and the States. Hobby Lobby should carry this stuff as well, along with pretty much any other arts and crafts/hobby store or even Walmart. The boards I got were a few 20"x30" inch, 1/4" thick boards.
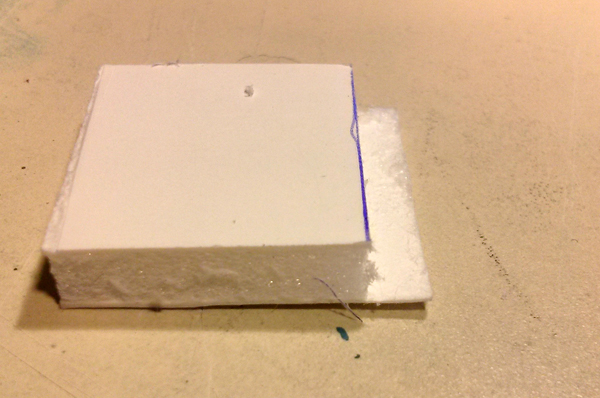
I started off measuring off a 15"x1" strip of the foam core to make up the walls of the building.


Just a few words of caution here before proceeding. If you're using a hot glue gun with foam, make sure you're working in a very well ventilated area. The nozzle on the glue gun can cause the foam to melt, which produces toxic fumes. I'd even advise on using a dust mask just to be extra careful. Watch out for that nozzle and fresh glue coming from it as you can suffer up to second degree burns from either!
Also, please be EXTREMELY careful when using ANY sort of sharp tools! I've got a nice inch and a half scar on the inside of my hand that earned me 12 stitches and numerous cuts and scars on my thumb from cutting towards in. A really easy way to circumvent the ever prevalent thumb cuts is to just put a bandage or two on before starting. This way you can pull your knife towards your thumb without worrying about slicing right through it.
I'm using white on white with the gloss finish here because it was on sale at Michael's - an arts and crafts store with a few locations in both Canada and the States. Hobby Lobby should carry this stuff as well, along with pretty much any other arts and crafts/hobby store or even Walmart. The boards I got were a few 20"x30" inch, 1/4" thick boards.
I started off measuring off a 15"x1" strip of the foam core to make up the walls of the building.

Unlike what you're seeing here, you should be using a sharp, unrusted knife. I prefer and Exacto or a retractable/extendable thinner knife. When cutting this stuff, make sure you're SLICING it and don't apply excess pressure, it'll cause the foam to break up instead of being cut through. Initially, you want to cut through the card layer on the first pass, the foam on the second, and the bottom layer third. The three cuts help keep everything nice and crisp because the indentation in the material will help guide your knife along with whatever straight edge you want to use.
I do switch the blade out after this cut because of how jagged some of the edges came out.
Because of the smaller scale you'll be working with, you want to make your measurements as precise as possible. A single millimetre could throw off the shape of the building and how things line up. Make sure you have a set of filing tools on hand to overcome this.

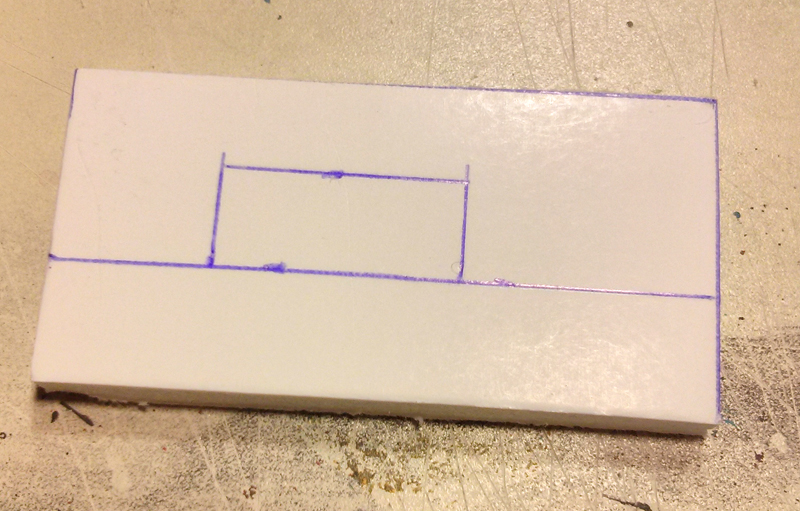
After cutting the strip, I measure out sections of the walls; 2", 1", 2", 2", 3", and 4". For this particular building I wanted to create an L-shaped, three level apartment style building.

Here's the rough shape of the building. I do make two adjustments to the 3" wall on the left and the 4" wall on the bottom. I take a 1/4" off each to accommodate for the method I use to glue and bond the walls together. Make sure you do a quick dry fit like this, as you may need to make adjustments as well. Masking take works well here to hold everything in place temporarily.

This is outlining the above mentioned method of joining the walls. You want to take two pieces of foam, lining first one perpendicular against the edge of the wall, and the second on top of the wall, also perpendicular. You'll make two cuts here, one through the first layer of card and the second through the foam. Take care not to cut through the bottom layer of card, as this will take off the layer and diminish the purpose of this method.

You'll be left with this; the bottom layer of card hanging out, uncut. This provides a nice right angle that the wall joining this will slot into nicely and provide two surfaces to hold glue.
For this building I cut out a few windows. If you want to do this, make sure you measure, draw up, and cut out the windows before the walls are glued together, it'll save a huge amount of time and effort.
Here's two of the walls joined together. I'm using a hot glue gun for this building, as it bonds the joints faster than regular white glue so I can work more consistently, and I also find that the bond is stronger. This is because of how water soluble the two mediums are; white glue can be thinned with water, where as hot glue doesn't thin without chemicals.
The hot glue doesn't get absorbed by the foam, so when you push the two walls together you may get some excess seeping out of the joint. Once the glue is dry you can just take your knife to the excess glue and cut away at it.

Here's a diagram of the join. The green line is the outer card layer, and the blue is the exposed foam layer.

After cutting out the windows for each wall section and cutting away the joints, I have a basic and sturdy wall structure ready for two more levels and some details.

Using the same methods as previously mentioned, I end up with three levels total. I found that each section got quicker as I went along. Muscle memory for the win. (The Hordes box was from a unit of Trollbloods Scattergunners that are currently awaiting paint and also provides some of the bases for this building)

After the structure is completed, I add bases/floors to each level. In this case I used some heavier cardstock which you can get from pretty much any box of anything. I find that GW and PP's boxes are a little thicker than Battle Front's. What also works really nicely are the boxes from any sort of frozen foods. These are about twice as thick and you'll probably have these on hand as well, plus it's one less thing heading to the land fills.

I add a few details, shown in the photos below. Names, window ledges and balcony walls made with tongue depressors/Popsicle sticks. For this scale, you might want to use new ones instead of used, as the moisture from one's mouth can cause the wood to swell and warp.
After adding the details, I give all the seams and edges a quick filing to clean up each level. Nothing says "I'M CARDBOARD" better than some frayed edges, like in the first picture.


This part is completely optional; I only did this to add some stability to the building, as my partner in war, Ilhan, has the biggest, meatyest, sausagey finger in the word. Because of his ham-fisted biology, coutless things get knocked over. These little pegs, made from kebab skewers, slot into holes in the bottom of the upper floor.


Lastly, here's a little bunker and barricade section I made using some lefter over pieces. I dimpled the flat surfaces of this one with the blunt point of one of my filing tools, to simulate bullet holes and to give the impression of concrete that's been beaten up a bit.

Before you starting painting any sort of foam, make sure you seal any exposed portions with some watered down PVA glue or a thick layer of cheap acrylic paint before priming. Some of the chemicals used in aerosol sprays will melt the foam into nothing, much like super glue. If you're using the glossier card like I am here, make sure you rough it up with some sand paper or some files before painting. This provides some nice grit for the paint to hold onto as well as a little bit of texture. You could also glue some regular old paper onto the surfaces of the walls or even use the thin tissue paper for wrapping presents to give it a bit of a stucco texture.
I hope this was helpful and I'll be posting either another tutorial on painting these or just pictures of the finished products!
Subscribe to:
Posts (Atom)